Move, resize, and align
How to operate.
If "Edit widget sequence" is activated, you can edit the placement of widgets in the extended layout.
Move
In the colored areas, you can drag and drop widgets to change their location.

Container
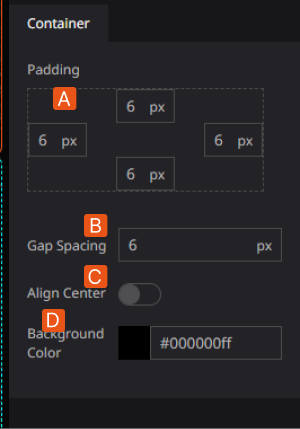
A. padding: specifies the margins within the area. The padding widget provides a graphical interface that allows users to adjust the padding of an element visually, by dragging the edges of a box representing the element. The padding widget displays the current values of the padding properties, such as padding-top, padding-right, padding-bottom, and padding-left, in pixels or other units of measurement.
B. Gap Spacing: specifies the spacing between widgets within an area. The gap spacing setting allows users to control the amount of space between digital twin elements, and to fine-tune the layout and design of their digital twin projects. Users can create more or less space between elements by adjusting the gap spacing, depending on their needs and preferences.
C. Align Center: when activated, the widget is centered within the area.
D. Background color: specifies the background color of the widget. users can change the color of the Container the way they like
Resize.
Depending on the widget, it can be scaled vertically, horizontally or both; if an icon with two arrows pointing outwards is displayed, the widget is scalable.

The Storytelling' installed by default is a good example of this. Move the Storytelling' widget to the center at the bottom and click the arrow button to extend the widget horizontally to its full width.
- Before change

- after the change

Placement.
![]()
In the non-corner areas, you can change the placement of widgets in the area.
When a widget is added to an area, the icon below or the equivalent horizontal icon appears around the centre. Click on this to change the widget placement in the area.